This is part of our series on Node-red; If you’d like to see more, see our Technology for Non-technologists post, or our series of posts on Node-red and sensors.
TL;DR – You can skip most of this article if you do the following:
1. Get a Heroku Node-red installation, as explained here
2. Add the necessary modules inside your Node-red deployment
3. Copy and paste the completed patch here
4. Follow the instructions to get your Twitter credentials
5. Follow the instructions here to configure your mLab MongoDB store
What we’ll do
We’re going to build a system which allows us to specify a search term, then monitors Twitter for tweets in which that search appears. For these tweets, we’ll plot them on a map (if the have useful geocoding information) and assign a (fairly rudimentary) sentiment score. We’ll then log them in a database, with a link back to the original tweet, the user, timestamp, message, and search that was responded to.
It’s a common enough task, but the few off-the-shelf tools involve buying into a proprietary platform. We will build this using Node-red, which gives us the added benefit of being able to run this persistently on a Raspberry Pi or Internet-based Platform-as-a-Service, like Heroku.
Contents
Things we need
We’ll need something that can run Node-red; we can create free internet-hosted (‘cloud’) systems on Heroku which have everything pre-configured; however, you may want to find a Raspberry Pi or use an online server of your own. There are some issues around the current Raspbian distribution, Twitter, and Node-red, which are discussed here. You’ll also need to manage your own MongoDB server somewhere – on your own Pi, own server, or hosted elsewhere – which is outside the scope of this article.
(Heroku may incur a $7/month ‘hobby’ tier, if we want 24/7 uninterrupted operations)
Infrastructure: Heroku
You will need to register an account at Heroku.
Heroku provides a ‘free’ tier on which gives us instant access to a system with access to a private MongoDB database and pre-installed Node-red. Once you’ve logged into Heroku (or created an account there), clicking the following link will provision a new machine and set it up for you.
Let it finish running, and make a note of the following settings:
| Setting Name | Usage | User-provided? |
|---|---|---|
MONGODB_URI |
Accessing the database | No |
NODE_RED_USERNAME |
Accessing the Node-red flow editor | Yes |
NODE_RED_PASSWORD |
Accessing the Node-red flow editor | Yes |
(A critical point: Do not rely on this system on Heroku if you’re not paying for at least the hobbyist tier ($7/month) or making short runs and immediately backing up your datasets. You Have Been Warned!)
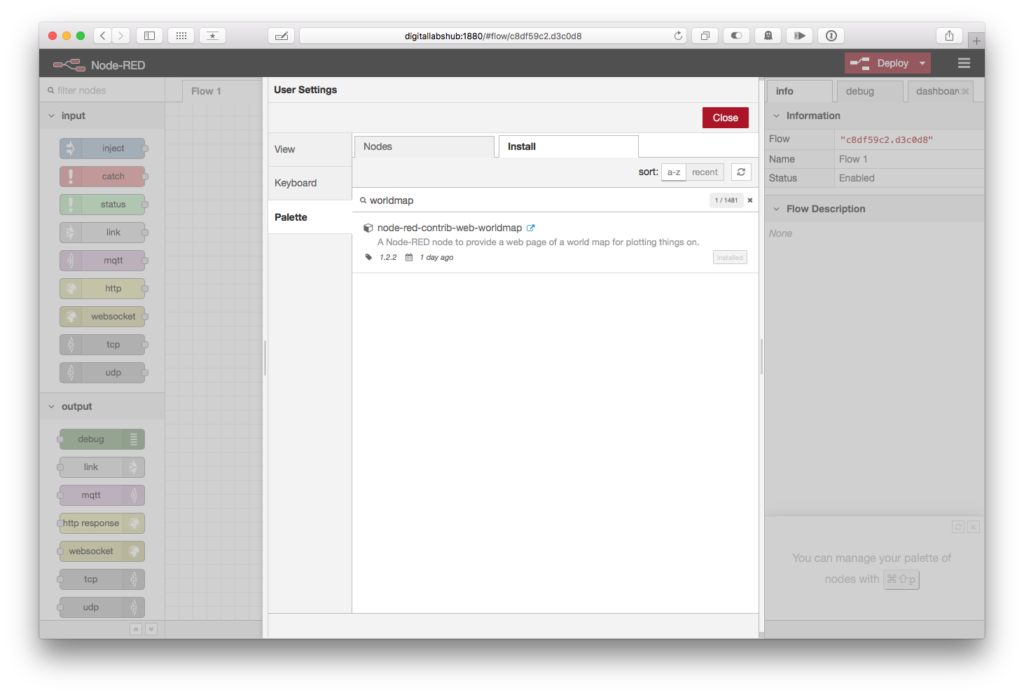
Adding modules
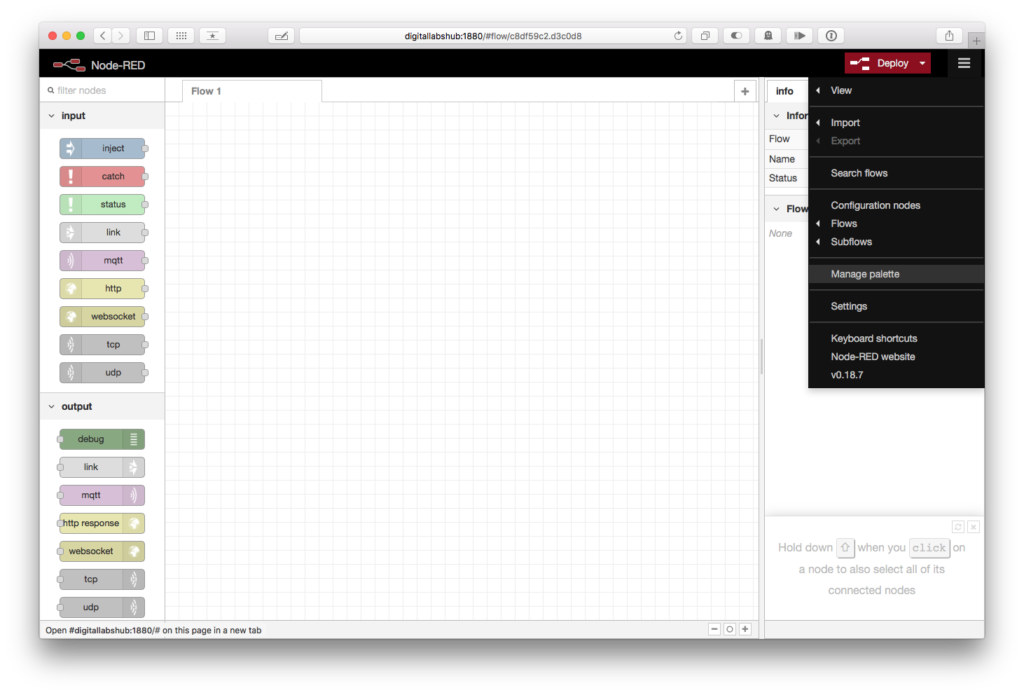
We’ll need a couple of extra modules. To install a module, click the top-right of the window (the three-horizontal strip ‘burger’) and pick ‘Manage palette‘, then Palette on the left, then Install on the top-right. Search for each of the following in turn, clicking the ‘install’ button by each as you go.
| Module name | Provides |
|---|---|
node-red-dashboard |
Dashboard interfaces |
node-red-contrib-mongodb3 |
Database interfaces |
node-red-contrib-web-worldmap |
Mapping interface |
Once these are installed, we can get on with patching. Refer to the note about running on a Raspberry Pi[1] if you are doing so.
Building the flow
The flow itself we will build up in pieces. Starting with querying twitter for a user-provided search term and transforming the resultant flow of data into objects, we’ll preview them in the debug console then plot on a world map, we’ll move on to storing the data into a Mongo database, before adding a few features to make the overall system more user-friendly.
Twitter access
Let’s put a few pieces together to extract a search term from Twitter, and log those tweets on a Map. We will expand this later into a bigger patch that will store them on disk and provide filtering functions, but for now – find the 'text input' node on the left side (in section ③, underneath the dashboard section). The box above the list of nodes has a useful ‘filter’ function, which may help you find the text input, by hiding the nodes that don’t match what you type into this box.
Drag the node into the flow editing area, and double-click it. A panel slides out from the right, allowing the node to be configured. We will use this node to set the phrase we will search Twitter for, but to do this, we have to follow a few steps:
- Under ‘
group‘, drop the menu down and pick ‘Add a new ui_group...‘, - Click the pencil icon to the right.
- A new panel appears – this allows us to configure a panel that holds the button.

adding a Twitter dashboard - In the ‘
name‘ section, enter ‘Twitter‘. - Under ‘
Tab‘, pick ‘Add a new ui_tab‘ to create a new section of this panel. - Click the pencil icon to the right to name it, and a new panel appears.
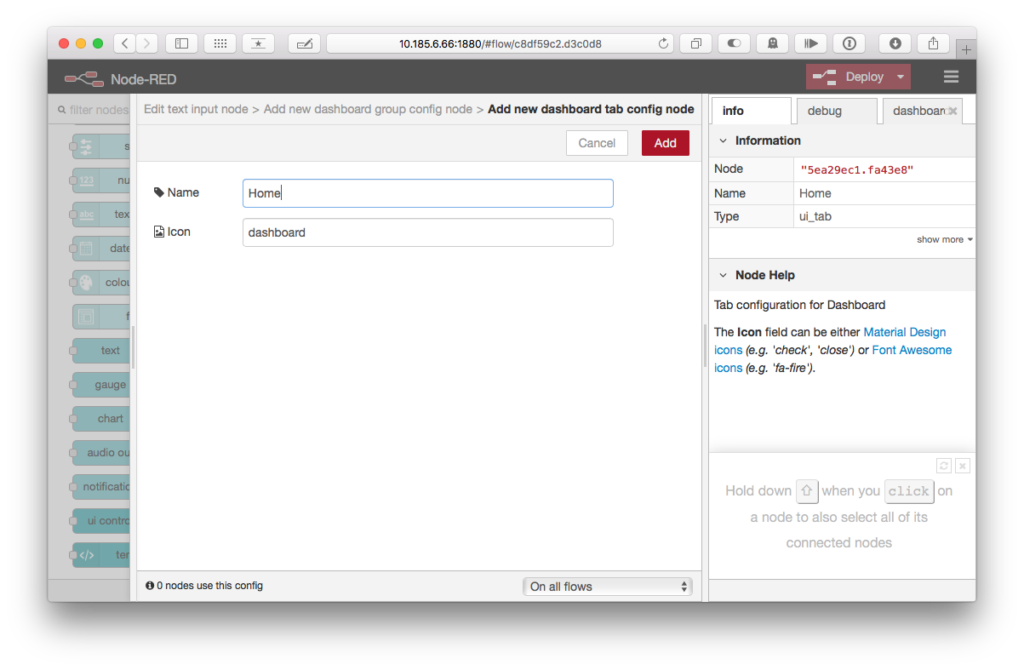
configuring dashboards - You can leave ‘
Name‘ as ‘Home’ and ‘Icon‘ as ‘Dashboard’, and click the redAddbutton in the top-right of this panel, returning us to the previous panel.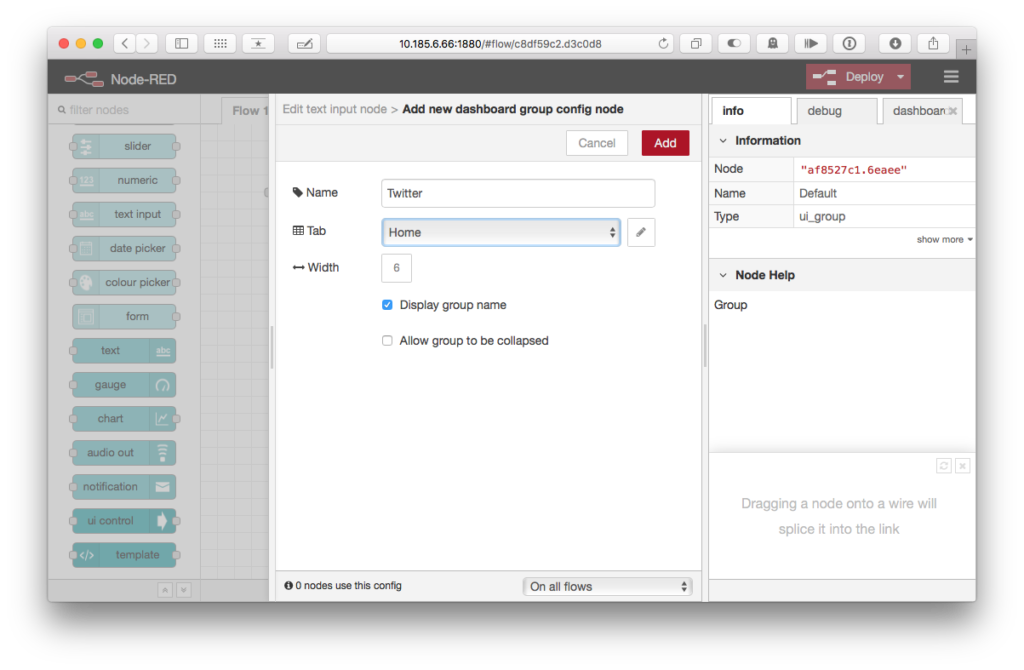
adding the ‘Home’ dashboard - The ‘
Tab‘ section now says ‘Home’, and we can click the ‘Add‘ button in the top-right of this panel. - We finish up by changing a couple of parameters in the text input element we’ve added to our ‘Twitter [Home]’ panel.
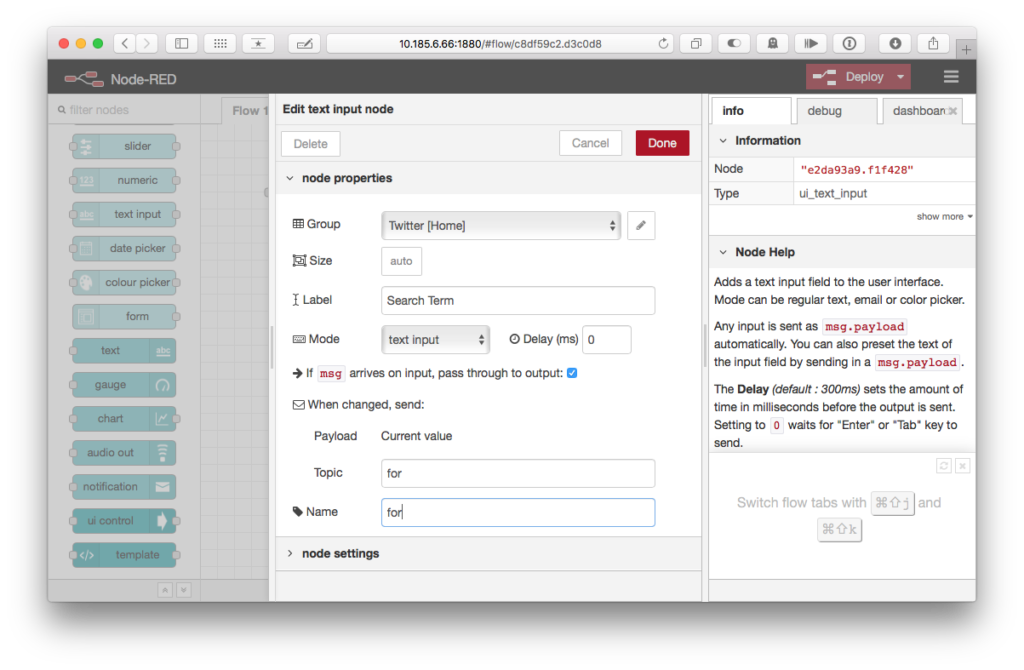
finishing the text input configuration - Set the ‘
label‘ to read ‘Search Term’ - Set ‘
Delay (ms)‘ (next to'Mode':text input‘) to zero (0). - In ‘
Topic‘, type'for'. - In ‘
Name‘, type ‘for‘. - Finally – click the red ‘
Done‘ in the top right.
The node appears configured on your flow editor. You will notice that the ‘Deploy‘ button in the top right is now white-on-red; this lets you know you need to send your editor changes to the Node-red runtime. Click it to do this, and after being notified of success, nothing changes.
However, it did. Your flow – though currently doing little – is now running. You have a new URL you can visit in another browser window or tab, at http://your-heroku-server-name.herokuapp.com:1880/ui/ (remember to substitute the IP address or hostname of the computer Node-red is running on if you’re using a networked machine – for example, http://raspberrypi:1880/ui/ ).
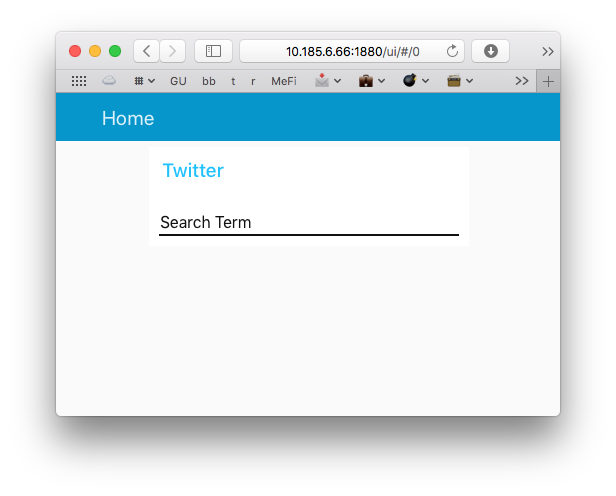
You should see a panel which says ‘Home’, ‘Twitter’, and ‘Search term’.
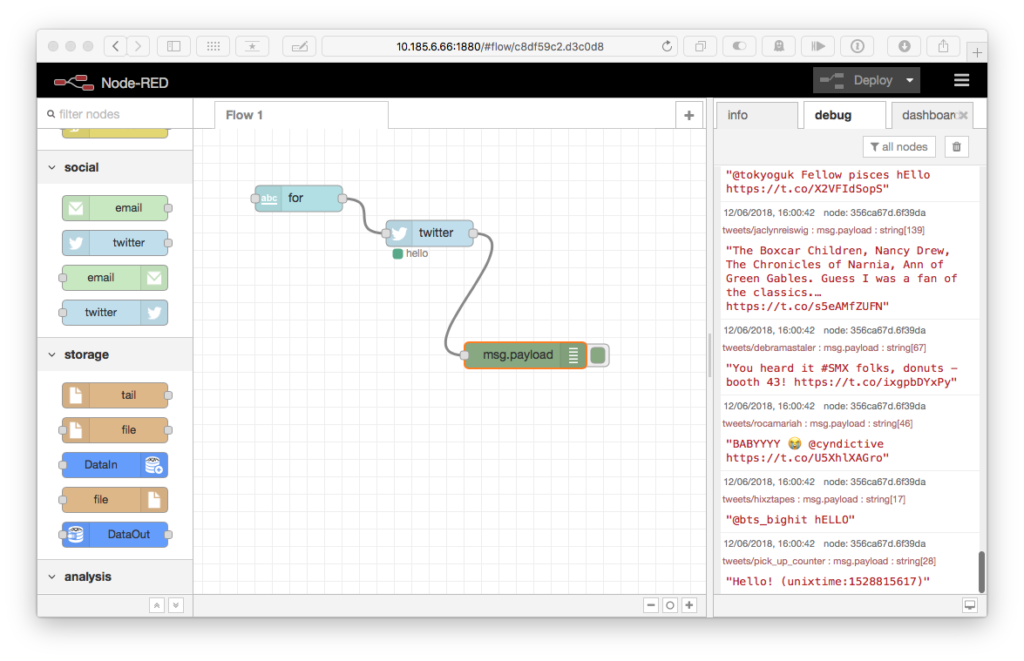
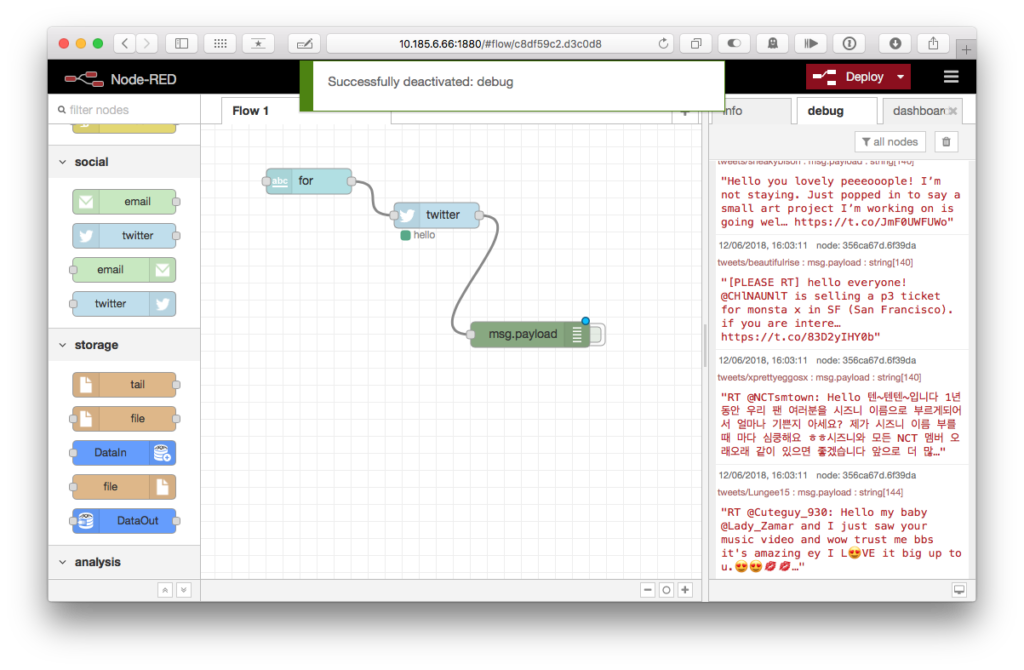
It still doesn’t do much. Let’s wire up a ‘debug‘ node, which outputs whatever is sent into it, making it easier to understand the data flow in our system. Pull a green ‘debug‘ node from the node list on the left onto the panel, then click on then drag the nodule on the right of the ‘for’ node to the input nodule (on the left) of the debug node you just dropped (which has changed its name to ‘msg.payload‘, and release. A wire appears between the two, indicating that data from the right of a node flows along the wire to the input of another node, on the left.
Click the ‘debug‘ tab on the right-hand side of the window and click the ‘deploy‘ button again. This time, try typing anything into the UI panel you created – for example, ‘hello’, then pressing the ↩ (Return) key on your keyboard.
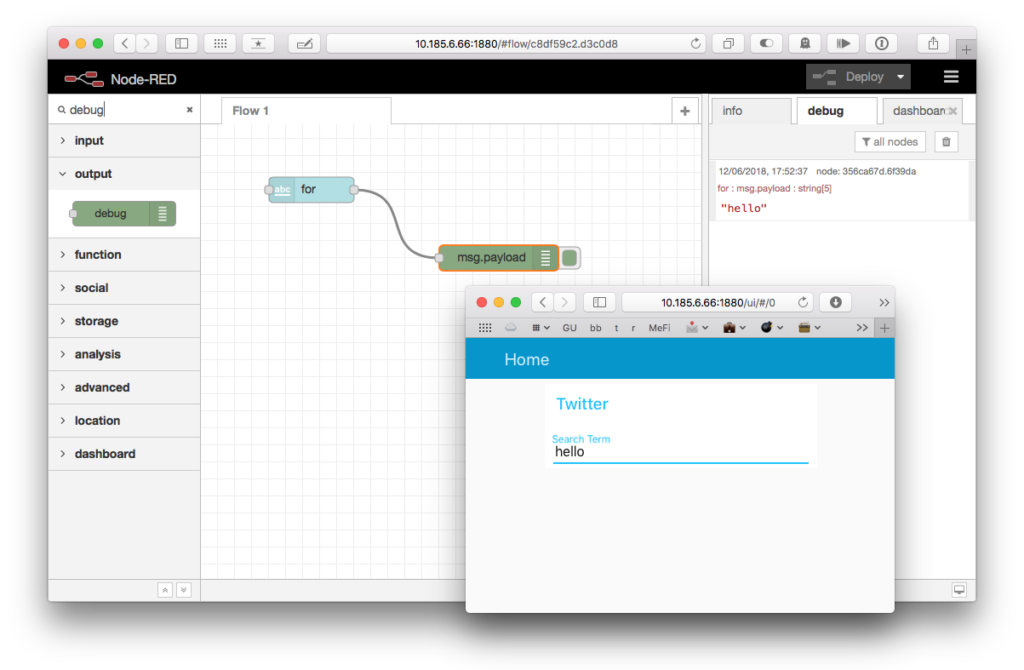
In the ‘debug‘ panel of the main Node-red window, you will see whatever you enter in the Twitter UI window appear. This shows you have taken input from the ‘text input‘ node called ‘for’ to the ‘debug‘ node.
Let’s use that textual input; instead of sending it to a debug node, where it’s essentially forgotten, let’s send it as a search term to a twitter node.

Drag a ‘twitter‘ node from under the ‘Social’ section – make sure it’s the Twitter Input node, with the icon on the left and the outlet on the right – and place it in the flow editor, to the right of the ‘for‘ node we created.
The red triangle indicates the node needs some configuration, so let’s do so by double-clicking it. It’s another multi-panel interface, so make sure ‘Add new twitter-credentials‘ is picked under ‘Twitter ID‘ and click the pencil icon.
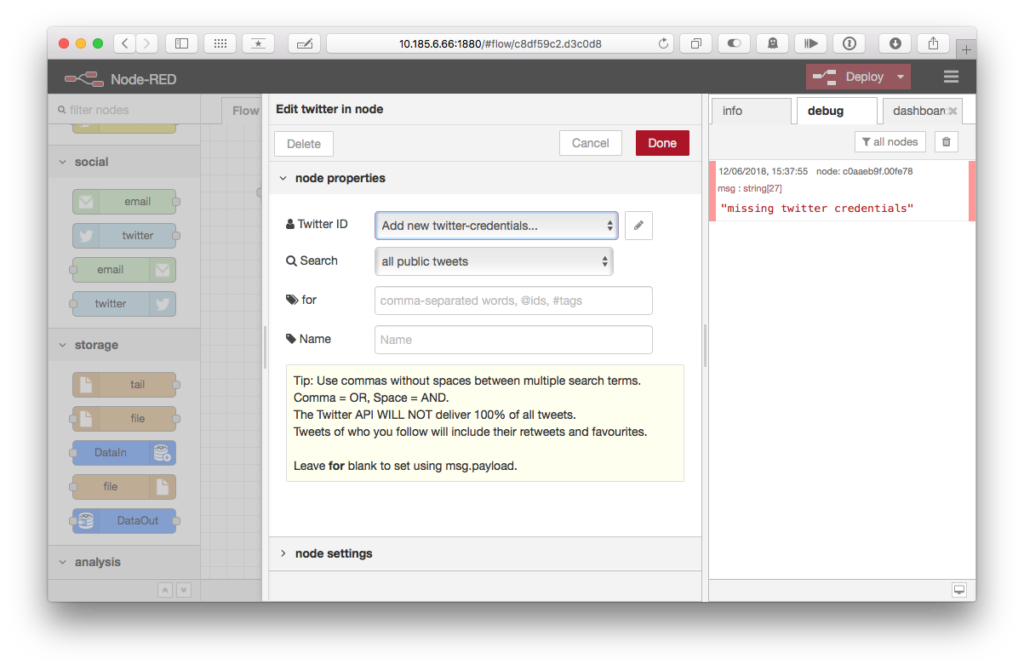
Getting the settings we need to configure the Twitter node requires that we create an Application associated with an account on Twitter.
Creating twitter credentials for the Node-red Application
We need to create an ‘Application’ on the Twitter web site – this will provide us with credentials to authenticate our Node-red system against Twitter’s API, which is what we have to use to get data from it. In another browser, visit apps.twitter.com (and if you don’t already have a twitter account, please create one before doing this – you’ll need it!)
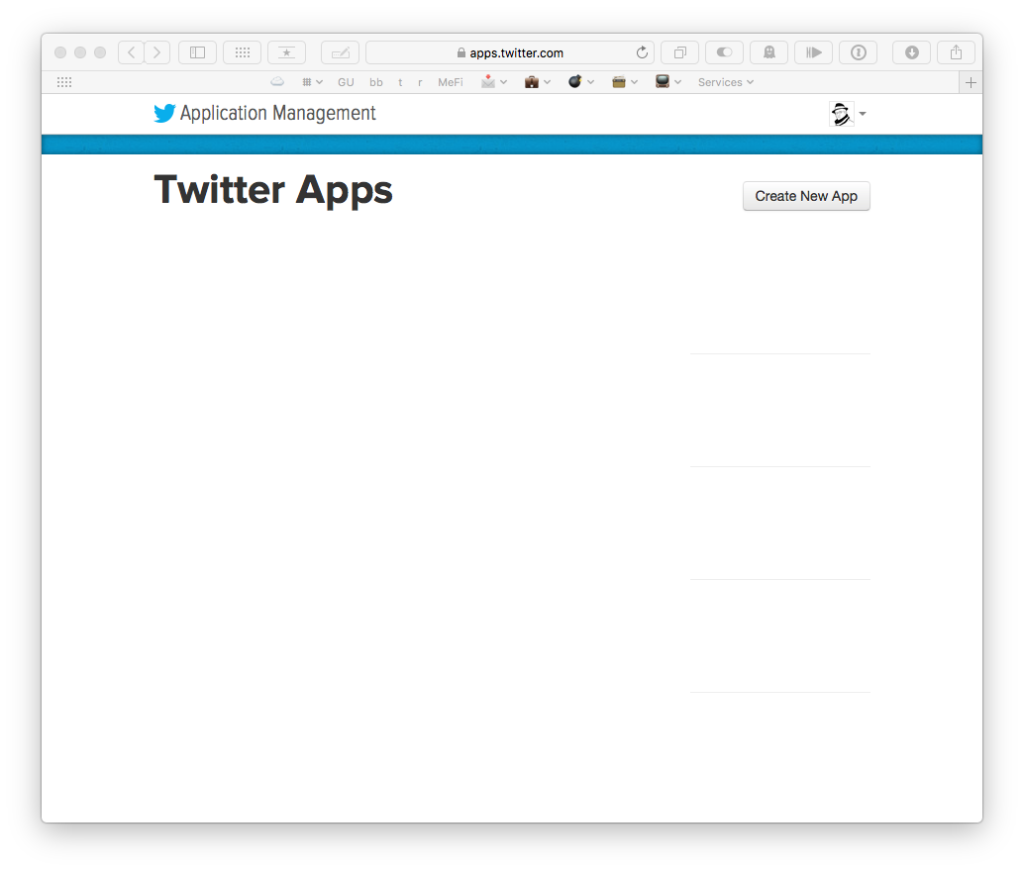
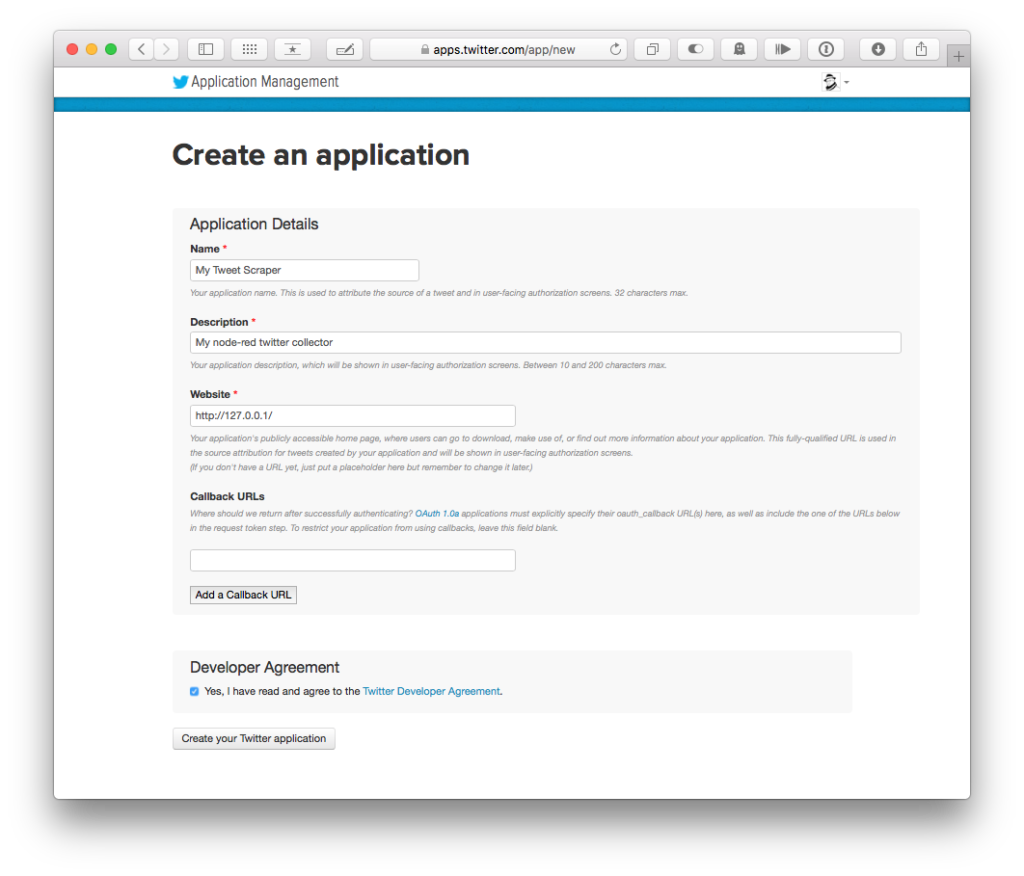
On the Twitter Apps page, click ‘Create New App‘, in the top right. You will need to provide some basic configuration here – as a suggestion,
- For Name, pick something like ‘
My Tweet Scraper‘. - For Description, enter something like ‘
My node-red twitter collector'. - For website, just enter ‘
http://127.0.0.1‘, regardless of what computer Node-red is running on. - For Callback URLs, just leave it blank.
Finally, tick the box under ‘Developer Agreement‘ to confirm you read the terms and conditions.
After clicking ‘Create my Twitter Application', you’ll be taken to a page listing details about the application you created.
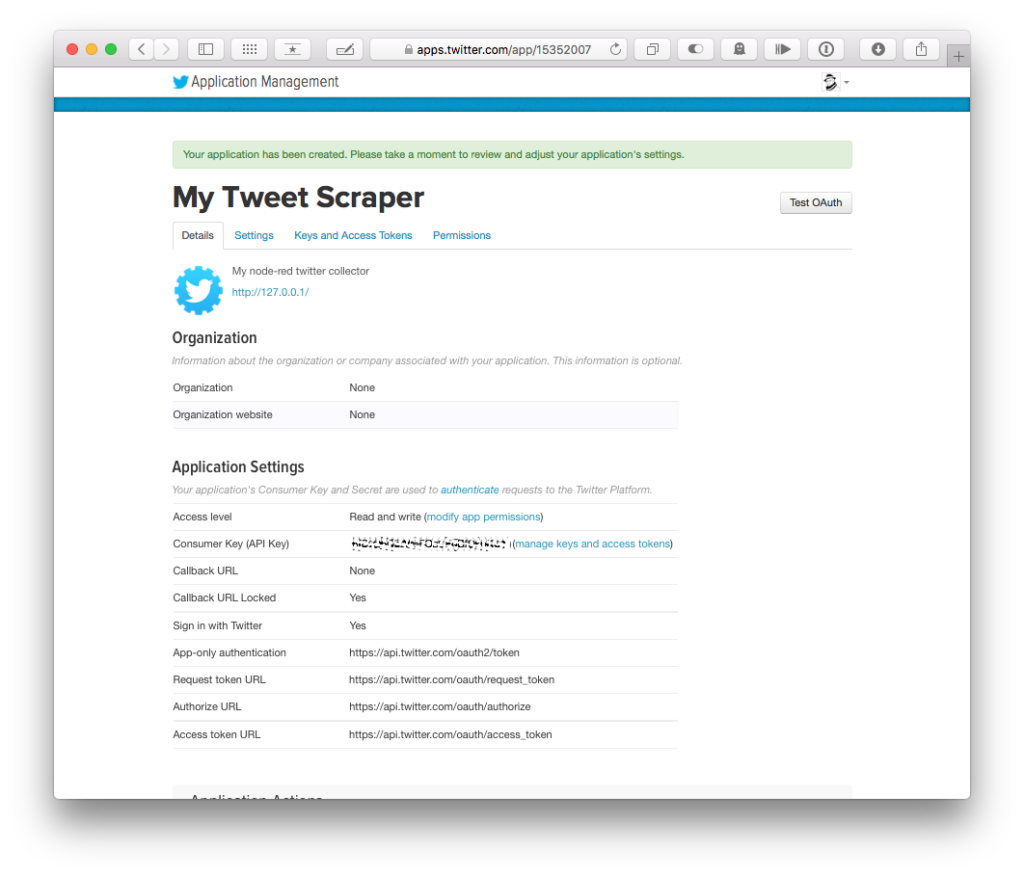
We have one final step to create our access credentials. Click the tab labelled ‘Keys and Access Tokens‘, then click the ‘Create my access token‘ under the ‘Token Actions‘ section near the bottom of the page.
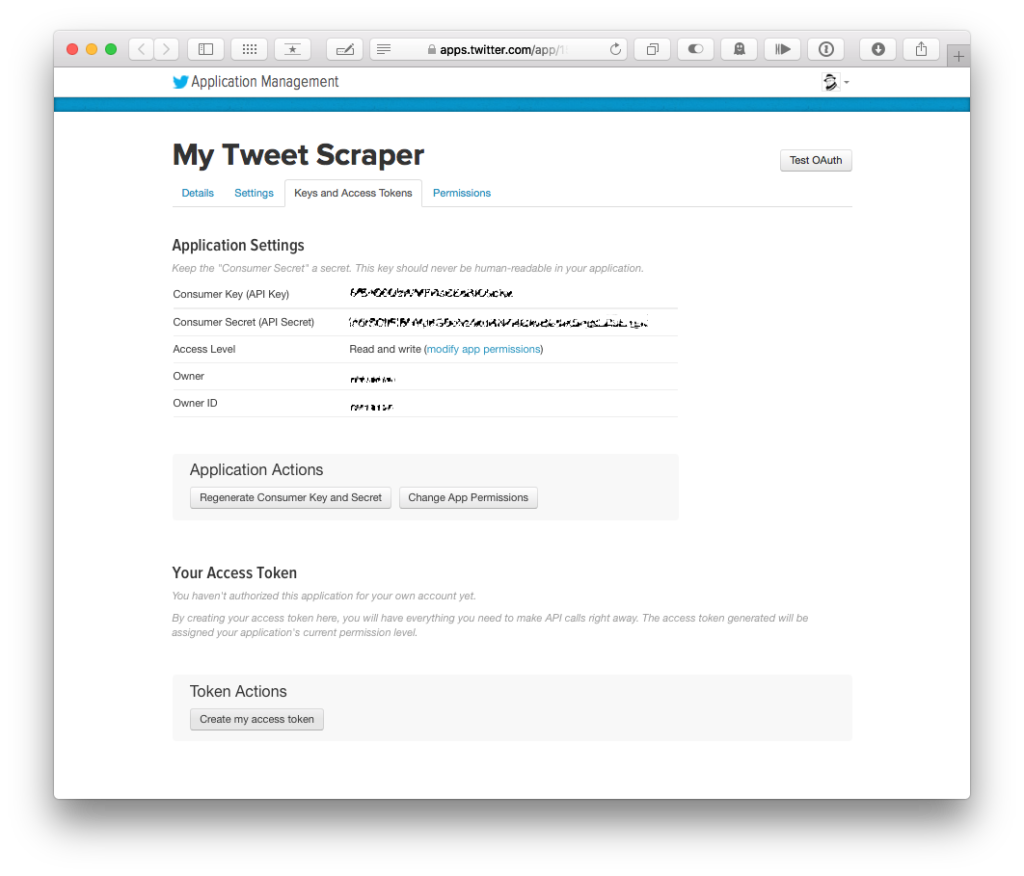
After a brief delay, the final page appears, giving us our application keys and tokens. We have to copy four of them over to the Node-red twitter page:
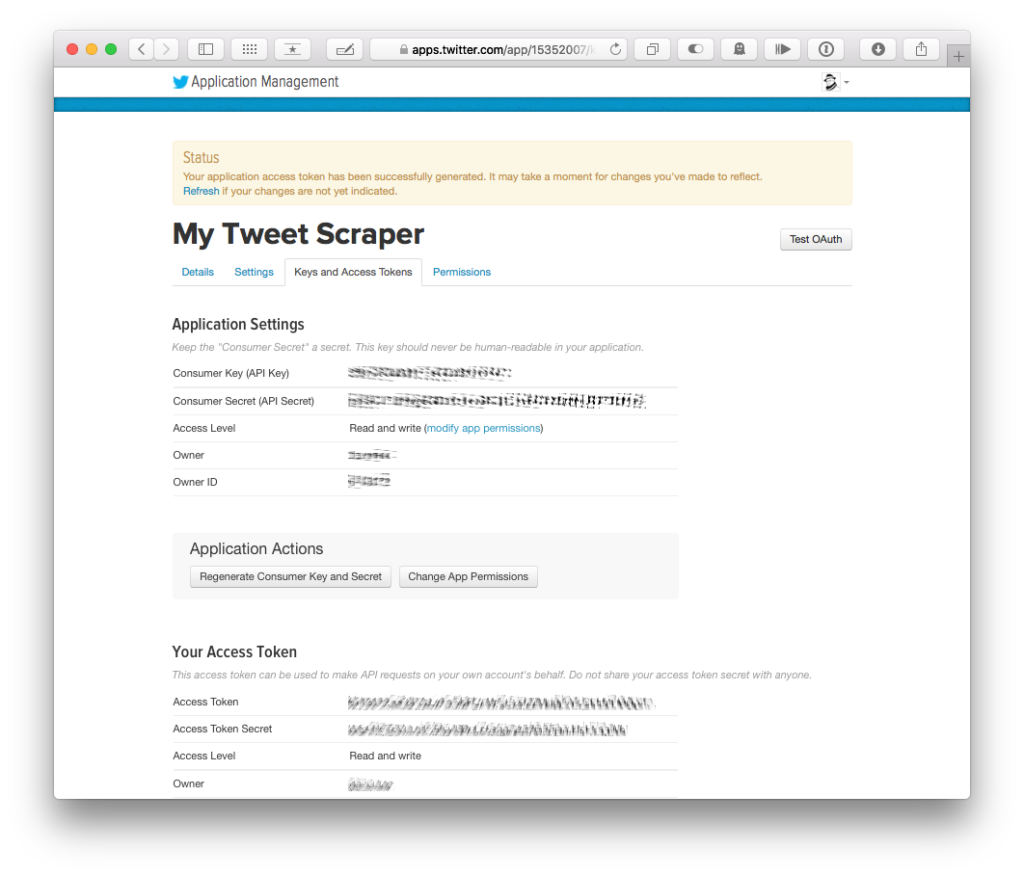
| Node-red field destination | Twitter Credential item name | |
|---|---|---|
| 1 | Consumer Key | Consumer Key (API Key) |
| 2 | Consumer Secret | Consumer Secret (API Secret) |
| 3 | Access Token | Access Token |
| 4 | Access Token Secret | Access Token Secret |
When all these items have been copied over, add your 'Twitter ID' where indicated, and click ‘Add‘.
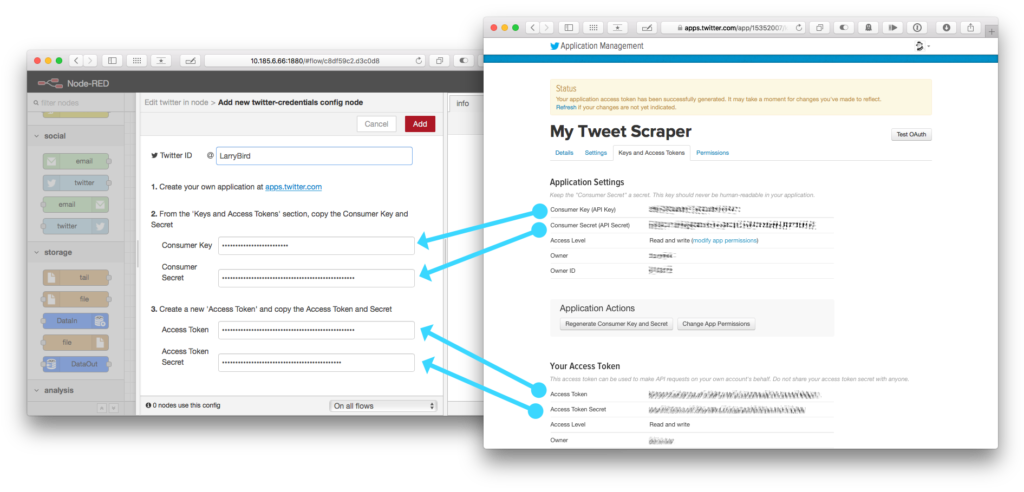
You may now click ‘Done‘ on the ‘Edit twitter in node'panel, in the top right. We have added our twitter application and associated them with Node-red instance.
Back to our flow …
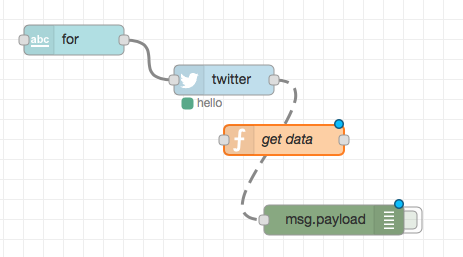
Click the connecting wire between ‘for‘ and ‘msg.payload‘, and press the ⌦ (delete) key on your keyboard (or backspace key, if you’re on a mac).
Wire the output of the ‘for‘ node to the input of the ‘twitter‘ node, then the output of the ‘twitter‘ node to the input of the ‘msg.payload‘ node, like the following:
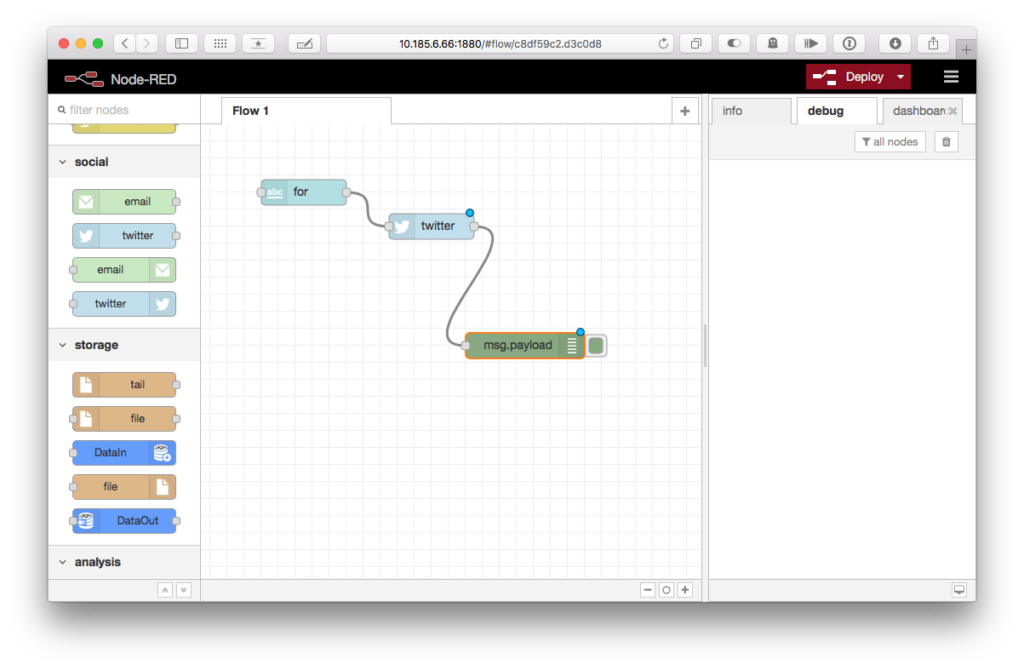
When you click 'deploy', and enter a search term in your Home/Twitter panel, you will see a relentless stream of tweets zoom by in the debug panel.
But this is not what we’re doing. We want to put them on a map, not see abstract textual representations. In the flow editor, click the button on the right of the ‘msg.payload‘ node – it will slide left, deactivating the debug output.
Drag a ‘function‘ node (under the ‘function‘ section, surprisingly, on the left) and double-click it. Change the ‘Name‘ to ‘get data‘, and replace the contents of the ‘Function‘ area with the following (you can copy-and-paste):
if(msg.tweet.hasOwnProperty('coordinates')){

if(msg.tweet.coordinates!==null) {

msg.payload={};

var m_p=msg.payload;

m_p.lat=msg.tweet.coordinates.coordinates[1];

m_p.lon=msg.tweet.coordinates.coordinates[0];

m_p.text = msg.tweet.text;

m_p.screen_name = msg.tweet.user.screen_name
m_p.name = msg.tweet.user.screen_name+’-‘+msg.tweet.id;
m_p.id = msg.tweet.id;
m_p.created_at = msg.tweet.created_at;
delete(msg.tweet);
delete(msg.location);
}
}
return (msg);
Click ‘Done‘ to save it, and move it onto the connection between the ‘twitter‘ node and the ‘msg.payload‘ node – the connected will become dashed, and if you release it, it will be patched in between the two other nodes (this is a huge time-saving technique in Node-red).
So, what does this new ‘get data‘ (a ‘function‘ node) actually do? Function nodes are enormously powerful – they let you run any arbitrary code on data flowing through it. All we do here is to copy a few key items out of the tweet – the date, username, location, and tweet ID – and forget all the extra data that’s a little overly technical (and unnecessary) for our use. This also prepares it to be plotted on a map…
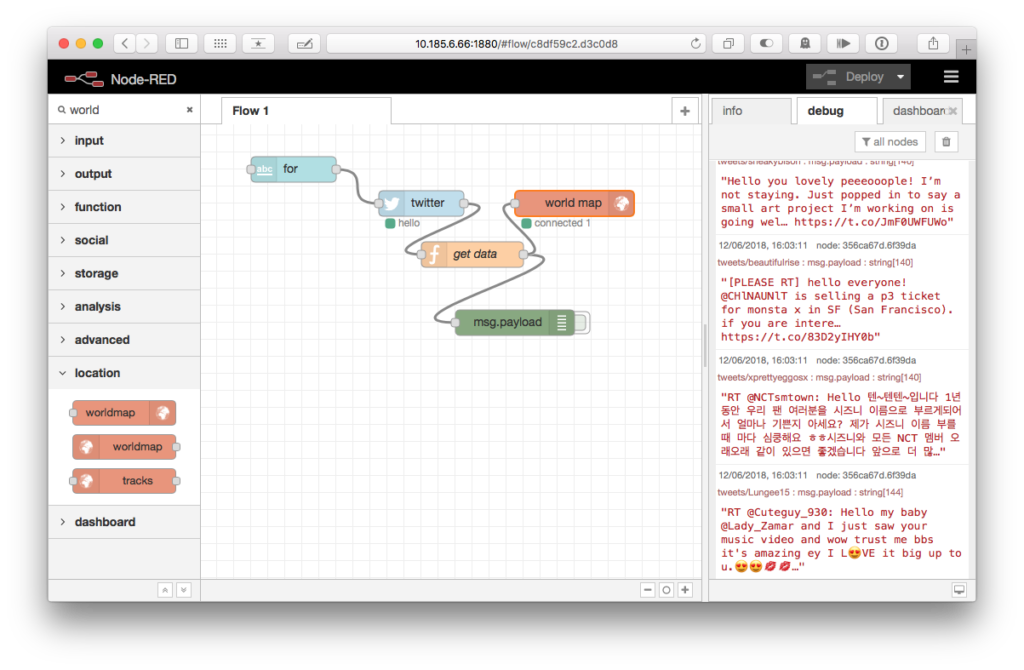
Finally, find a ‘world map‘ node on the node list panel with an inlet on the left and an icon on the right, and drag it onto the flow editor. Hook the output of the ‘get data‘ node into the input of the ‘world map‘, and click ‘Deploy‘.
Find the browser window with the ‘Home/Twitter‘ interface, and enter your search term again (or press ↩ if it’s already there) to update the input (you should see a green dot under the ‘twitter‘ node in the main flow editor and the term you provided appear next to it).
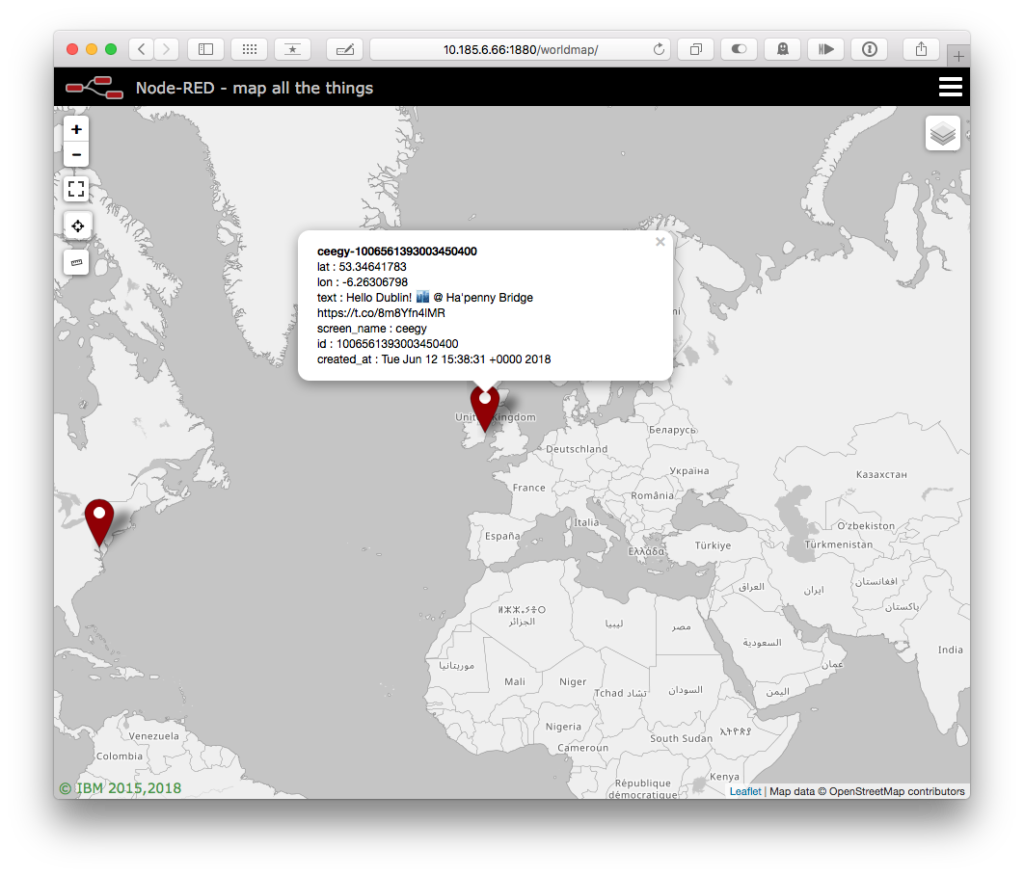
Open another browser window, and visit http://yourherokuapp.herokuapp.com/worldmap/ (or if running on a local network machine, substitute the IP address or hostname again – for example, http://raspberrypi/worldmap/). A map appears, centred on Winchester. With all due respect to Winchester, zoom out a few steps to get a view of the world. Tweets will start appearing, and clicking a marker on the map will reveal the data extracted by the ‘get data‘ node.
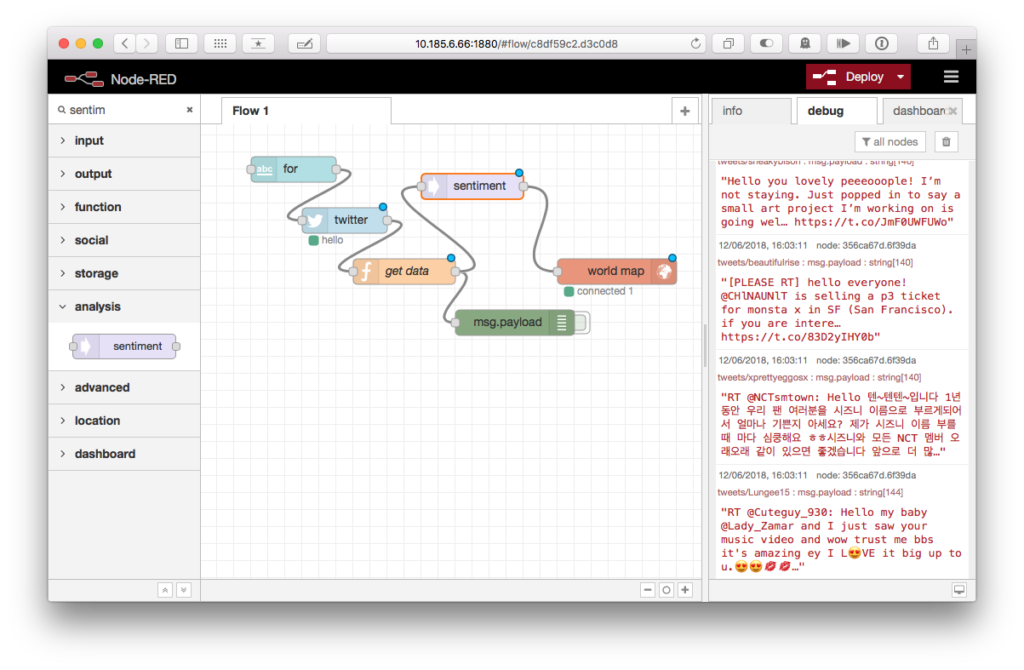
We can go a step further. Let’s automatically analyse each tweet and use a positive/neutral/negative marker on the map to reflect the AFINN–111 sentiment analysis score of the contents of each. Drag a sentiment node from the panel on the left and drop it on the connector between ‘get data‘ and ‘world map'(you may need to move nodes around a little to make this easier to achieve).
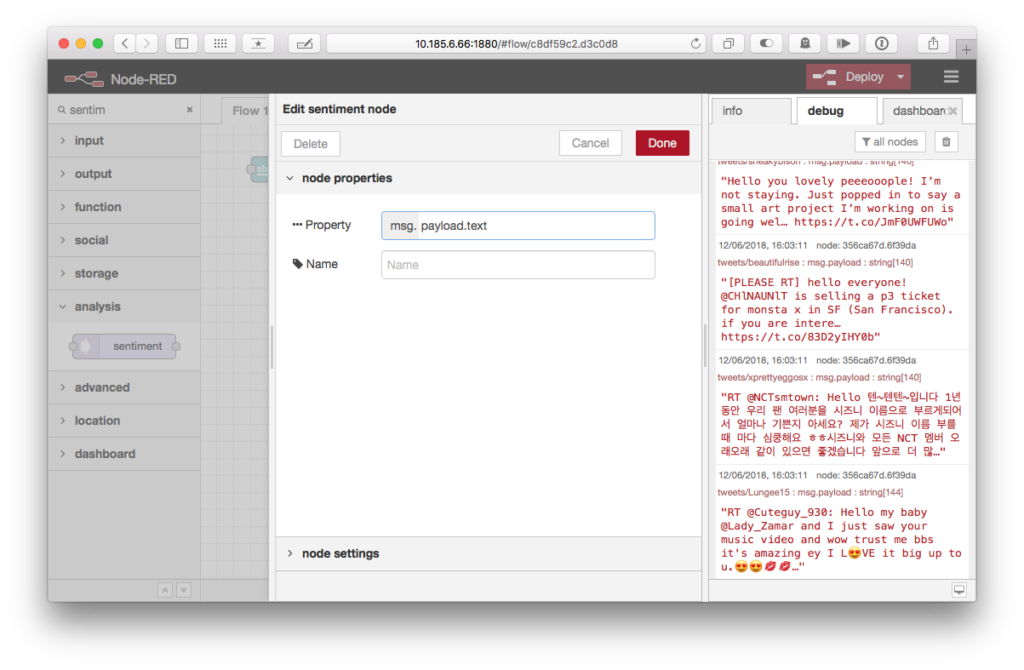
Double-click the new ‘sentiment‘ node, and set the 'Property' value to payload.text before clicking ‘Done‘ in the top-right.
Drag another ‘function‘ node between the ‘sentiment‘ node and the ‘world map‘ node. Double-click it and change the ‘Name‘ to add icon. Paste the following code in, before clicking ‘Done‘ in the top-right.
if(msg.hasOwnProperty('sentiment')) {

if(msg.sentiment.hasOwnProperty('score')) {

if(msg.sentiment.score<0) {

msg.payload.icon='hostile';

} else if (msg.sentiment.score>1) {

msg.payload.icon='friend';

} else {

msg.payload.icon='neutral';

}

msg.payload.sentiment = msg.sentiment.score;

return msg;

}

}
This will tag the incoming message with a new icon property, based on the sentiment score created by the ‘sentiment‘ node.
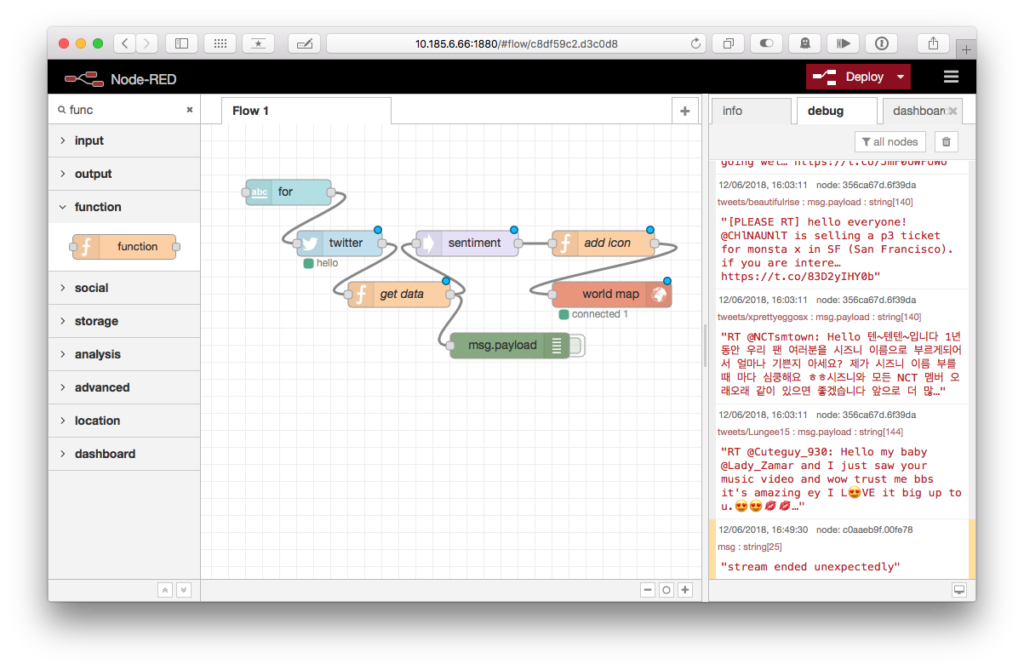
Deploy again, re-send the ‘Search term‘ in the Home/Twitter panel, and refresh the browser window with the map.
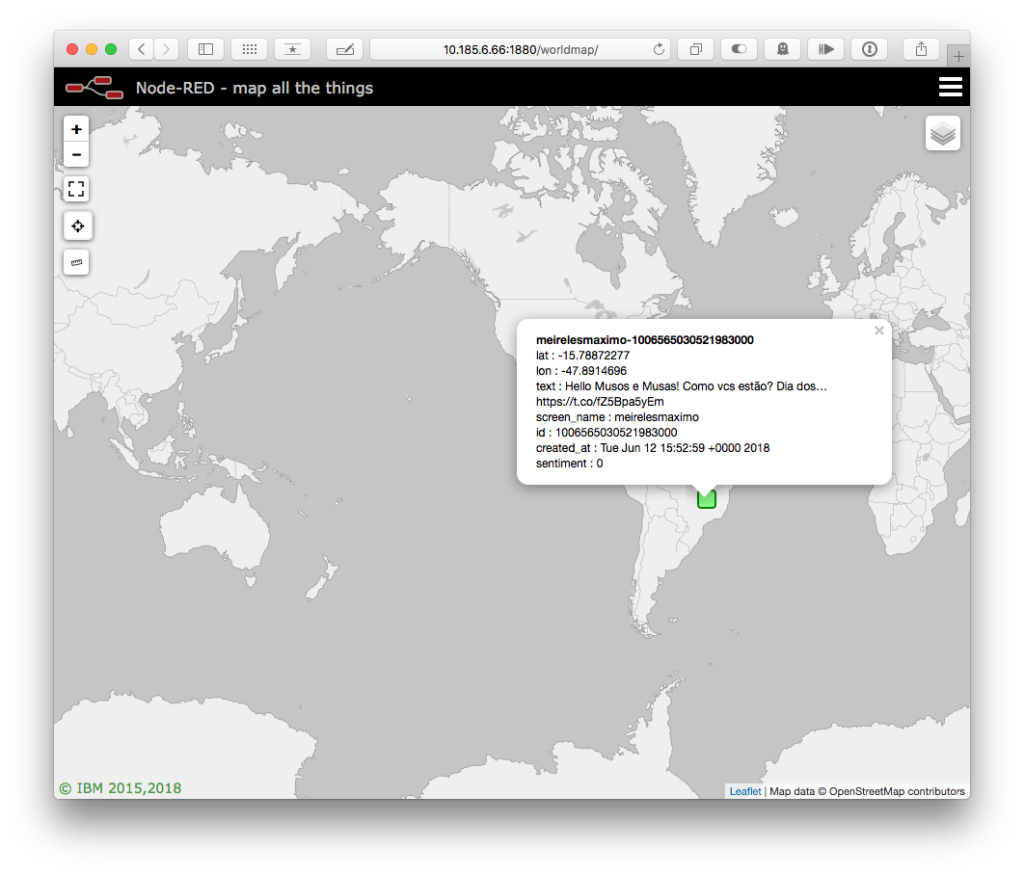
Tweets that appear now have a colour code identifying whether they are positive, neutral, or negative. Clicking one will open a panel, and the ‘sentiment‘ score will be visible at the bottom.
Another way of entering this in Node-red
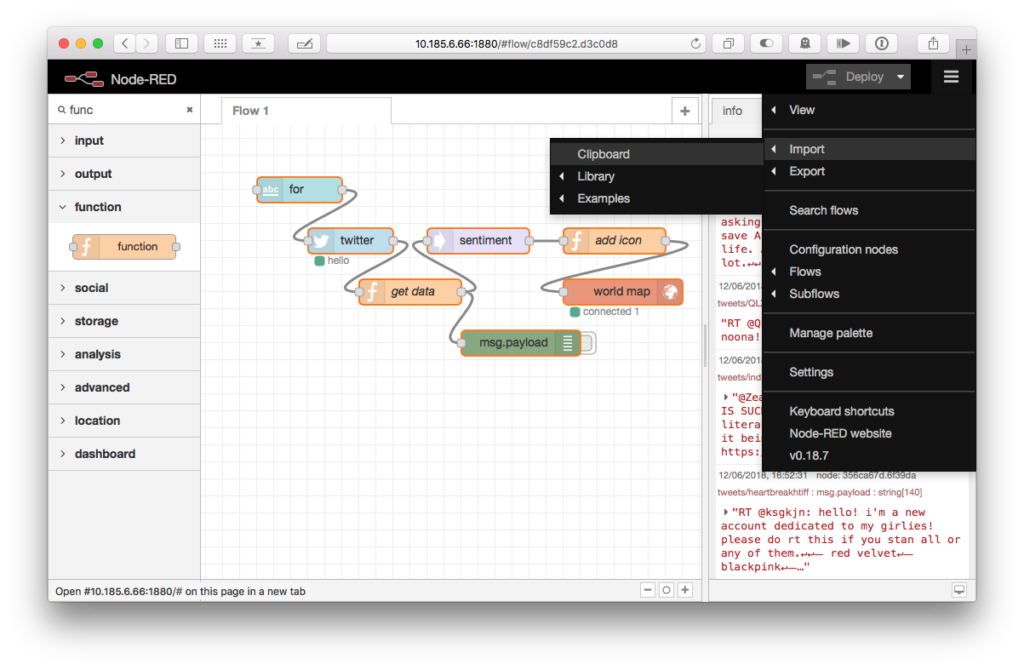
You can copy and paste entire Node-red flows (or selected parts of them) by using the menu at the top right of the Node-red window. Pick ‘← Import' and under that menu item pick ‘Clipboard‘. In the Import nodes panel that appears, copy and paste the following text:
[{"id":"e2da93a9.f1f428","type":"ui_text_input","z":"c8df59c2.d3c0d8","name":"for","label":"Search Term","group":"42bc9b03.0500c4","order":0,"width":0,"height":0,"passthru":true,"mode":"text","delay":"0","topic":"for","x":130,"y":80,"wires":[["c0aaeb9f.00fe78"]]},{"id":"356ca67d.6f39da","type":"debug","z":"c8df59c2.d3c0d8","name":"","active":false,"tosidebar":true,"console":false,"tostatus":false,"complete":"false","x":390,"y":260,"wires":[]},{"id":"c0aaeb9f.00fe78","type":"twitter in","z":"c8df59c2.d3c0d8","twitter":"","tags":"","user":"false","name":"","topic":"tweets","inputs":1,"x":190,"y":140,"wires":[["de36bc4d.c1c43"]]},{"id":"de36bc4d.c1c43","type":"function","z":"c8df59c2.d3c0d8","name":"get data","func":"if(msg.tweet.hasOwnProperty(\"coordinates\")){\n if(msg.tweet.coordinates!==null) {\n msg.payload={};\n var m_p=msg.payload;\n m_p.lat=msg.tweet.coordinates.coordinates[1];\n m_p.lon=msg.tweet.coordinates.coordinates[0];\n m_p.text = msg.tweet.text;\n m_p.screen_name = msg.tweet.user.screen_name\n\n m_p.name = msg.tweet.user.screen_name+\"-\"+msg.tweet.id;\n m_p.id = msg.tweet.id;\n m_p.created_at = msg.tweet.created_at;\n \n //m_p.original = msg.tweet;\n \n delete(msg.tweet);\n delete(msg.location);\n }\n}\n\nreturn (msg);","outputs":1,"noerr":0,"x":260,"y":200,"wires":[["356ca67d.6f39da","967ddaeb.cdd38"]]},{"id":"176adcbd.728f83","type":"worldmap","z":"c8df59c2.d3c0d8","name":"","lat":"","lon":"","zoom":"","layer":"","cluster":"","maxage":"","usermenu":"show","layers":"show","panit":"false","x":510,"y":200,"wires":[]},{"id":"967ddaeb.cdd38","type":"sentiment","z":"c8df59c2.d3c0d8","name":"","property":"payload.text","x":340,"y":140,"wires":[["2b708212.b6287e"]]},{"id":"2b708212.b6287e","type":"function","z":"c8df59c2.d3c0d8","name":"add icon","func":"if(msg.hasOwnProperty(\"sentiment\")) {\n if(msg.sentiment.hasOwnProperty(\"score\")) {\n if(msg.sentiment.score<0) {\n msg.payload.icon=\"hostile\";\n } else if (msg.sentiment.score>1) {\n msg.payload.icon=\"friend\";\n } else {\n msg.payload.icon=\"neutral\";\n }\n msg.payload.sentiment = msg.sentiment.score;\n return msg;\n }\n}","outputs":1,"noerr":0,"x":500,"y":140,"wires":[["176adcbd.728f83"]]},{"id":"42bc9b03.0500c4","type":"ui_group","z":"","name":"Twitter","tab":"ba46c2d9.c15208","disp":true,"width":"6","collapse":false},{"id":"ba46c2d9.c15208","type":"ui_tab","z":"","name":"Home","icon":"dashboard"}]
Make sure you have set ‘current flow‘ under Import to and click ‘Import‘ in the bottom-right of the window. Click again in the flow editor to paste the nodes into place. You will still need to configure the ‘twitter‘ node with account credentials, so review the Twitter Credentials section of this guide, copy over the necessary parameters, and click ‘deploy‘ – or just pick your existing credentials (double-click the new twitter node, then on the ‘*Edit twitter in node’ panel click the menu by Twitter ID and pick your previous account, which will be listed as an option, then click Done and Deploy your updates).
Beyond the basics: Map management and Data storage
Thus far, we have a system that shows live data on a map, based on a search term provided in another window. We set icons on each item according to the sentiment of the message. If the message doesn’t have a latitude and longitude associated with it, we throw it away.
Let’s make a number of improvements.
- If we add a ‘layer’ property to the items going to the map, we can manipulate whole layers.
- If we notice the search term change, we should clear the map, to avoid a misleading display.
- We should store the data in a database, so we can easily extract it and re-use it with other tools.
- When we enter a search term, we should check the database for existing matching tweets, and put them back on the map, so we can use this to visualise previous data.
Associating a tweet with a layer
This is a fairly simple operation; let’s use a function node between add icon and our world map nodes. The code for this node is only two lines:
msg.payload.layer="tweets";
return msg;
We need to do this to be able to remove the dataset shown on the map; if we don’t set a layer, we can’t tell that layer to clear itself. This has no effect yet but will be invaluable soon enough…
Clearing the map on search term change
We will add a function node that is notified when the for node changes, and sends a payload on to the world map node. Drag a new function node out on to the flow editor, and double-click it to edit it.
Give it a Name of clear the map. In the Function code editor, paste the following:
// ignores the inbound message and instead

// generates a payload for the map that contains

// the "clear map" command

msg.payload={

"command": {

"clear":"tweets"

}

};

return msg;
This replaces the standard msg object’s payload with a new one, which contains one object (command), which contains the key clear – this is a command the map understands, and tells it to clear a named layer – the name being provided as the value of the key ‘clear‘.
Save this node by clicking ‘Done’ and route its output to the input of the world map. When something triggers this node, it will tell the map to erase itself.
We need to set the trigger, though. Our high level logic is ‘when the user changes the search term, we should erase the map.’. We know that when the ui text_input node detects a change, it emits a message, so add a new flow from that node to the input of our clear the map node to achieve realise this logic.
Deploy the new flow, and refresh the world_map browser window. Provide a common search term (maybe hello?) and watch a few tweets appear. Change the UI ‘Tweet’ control to another term (maybe trump?) and the map clears out before adding (a deluge) of new tweets.
Data storage: MongoDB
Our Heroku instance came with some free storage, on a MongoDB server.
MongoDB is a document-oriented database, which basically stores JSON-style objects as records.
This is great for us; JSON is the JavaScript Object Notation. JSON objects are exactly the same as the variables we create in function nodes, and the core msg object itself – at a geeky level, JSON objects are actually executable JavaScript code that will recreate the same data structures.
(Strictly, MongoDB stores BSON objects, but we can pretty much ignore that and pretend they’re just native JSON)
Connecting Node-red to MongoDB
(If you’re following the TL;DR version of this article, there’s a quicker way to re-configure the MongoDB connections, all at once. Click the edit menu in the top-right of the Node-red browser window, then click Configuration nodes. Find the item labelled Heroku mLab under a mongodb3 category, and double-click it. You can simply paste your MONGODB_URI into the URI input box, then click Update).
It’s almost ridiculous how easy this is to get started with, so don’t worry! Take a look at your Heroku dashboard again, and under the ‘Settings‘ tab, click the Reveal Config Vars button. Under here, take a note of your MONGODB_URI setting – this is what we’ll need to access the database.
In the node list, find (under the storage section) the mongodb3 node we added earlier. Drag it into your flow editor, and double-click it to configure it. We need to point it to out MongoDB server using our credentials.
Under Service, click the menu and choose External Service, and under Server, pick Add new mongodb3….
Click the pencil icon, and a new panel appears, ‘Edit mongodb3 in node > Edit mongodb3 node‘. Give it a name we can recognise – maybe ‘Heroku MongoDB’ – and in the URI field, paste your MONGODB_URI – the Username and Password are encoded already in the Mongo connection URI.
Click Save and return to the ‘Edit mongodb3 in node’. Leave Collection blank, and make sure Operation is set to Dynamic (msg.operation). This allows us to do two things.
The mongodb node is a jack of all trades. It can be used to query items, insert items, change items, and work with different sets of data. We could have given a specific data set (collection in MongoBDese) to work with in this panel, and we could have set the node to perform a single operation (Insert), but what we can do in Node-red is specify the use of the node by setting properties in the inbound msg object we send. Have a brief look in the Operation drop-down menu to get an overview of the things we can do with the node, before returning it to Dynamic (msg.operation).
Save this node with the Done button in the top-right.
Hooking MongoDB into our data flow
We’re going to take the output of the add icon node, and send it to the mongodb3 node we just added. However – we can’t just throw data at it, we have to let it know what we want done with the data we throw.
Add a function node and send the output of the add icon to. Double-click it, Name it prep insert (so we know what it does) and enter the following code:
var new_msg = {

'collection'    : 'tweets',

'operation'     : 'insert',

'payload'       : msg.payload

};

new_msg.payload.search_term = flow.get('search');
return new_msg;
We create a new message object, and set the payload property to the inbound msg.payload item.
The new two properties we set determine what and where our Mongo server does things with our data.
We set the ‘operation‘ property to insert, which tells it to save the data we send. We set the ‘collection‘ to tweets, which we can think of as the label for the storage area we put it in – a bit like a table in a traditional relational database.
We need to store the specific search term we used to discover this tweet in this record, which is what the user sets when they enter something in the UI textbox (labelled for on our flow editor).
We set this in ‘search_term‘, which is stored in a a flow object. We need to set this up, but first, drag the outlet of our new prep insert node to the inlet of the mongodb3 node we added to our editor. Save this node.
Finally, let’s set that ‘search_term‘ up. Drag a function node from the node palette to the flow editor and double-click it to edit it. Name it store search term and paste the following in the Function editor.
// stashes the search term in the 'flow' object

// which is shared amongst all the flows

flow.set('search',msg.payload);

return msg;
As well as a msg object, every node has access to a ‘flow’ object, but the difference is that the flow object persists – it doesn’t change, unless we tell it to. This means we can use it to store data and share it across nodes that aren’t connected to each other, doing a kind of code-based run around of the msg object method of cleanly passing data around. Sometimes, it’s the right thing to use.
Here we use the .set method on the flow object, and we pass in the name of the key we want to set, and the value we want to set it to – so here, we’re setting ‘flow.search’ to be whatever is passed in. Save the node by clicking Done and let’s wire the output of the for node to the input of the store search term node. By doing so, the prep insert node has access to the search term the user has set, despite not being immediately connected to the node.
When we deploy this, and provide a search term to our UI, we should see the ball under the bottom-left of the mongodb3 turn yellow, and the leading number match the number by ‘success’ (with error remaining at 0). If this isn’t the case, double-click and double-check your mongodb3 credentials and access URL.
Let’s do one last thing to the logic – as well as erase the map when we start a new search, let’s pull out all of our matching records from our database and put them on the map. We do this by creating an object that describes a query for our MongoDB collection, and then sending that first to a MongoDB node, which sends the documents it finds on to the ‘set layer‘ node.
Add a function node and connect the for node’s outlet to its inlet. Double-click it and Name it query existing data, and set the Function to be
// when a new search term arrives, it queries

// the database for existing tweets that match

// this term to re-populate the map

var new_msg = {};

new_msg.collection = 'tweets';

new_msg.operation  = 'find.forEach';

new_msg.payload    = { 'search_term' : msg.payload };

new_msg.projection = { 'search_term' : 1 };

return new_msg;
This creates a new message object (new_msg), and sets a few properties that a mongodb3 instance will respond to. ‘collection‘ matches the collection we’ve been storing our data in – tweets. Our ‘operation‘ is find.forEach, which finds every matching item, and passes it on through the outlet, one at a time (more operations are documented on the MongoDB site).
Finally, we set the search terms we’re looking for. We set the ‘payload‘ to be an object with one property, ‘search_term‘, which takes in the inbound ‘msg.payload‘ from the inbound message.
Drag out a a mongodb3 node from the node palette. Connect the outlet of your new query existing data node to this new mongodb3 node. Double-click it and configure the Service to be an ‘External service‘, and the Server to be the same mongo DB you created earlier. Leave Collection blank, and set Operation to Dynamic (msg.operation). Click Done – we didn’t need to create a new Server connection, as Node-red will allow us to choose from the ones we’ve already created in this flow.
Drag the outlet of this node to the inlet of the ‘set layer` node, so the documents we stored earlier (one for each tweet, remember?) get stamped with a ‘layer’ property set to ‘tweets’.
`Deploy’. We now have a fully-operational system, capable of recording multiple sets of tweets with different search criteria in a database, and plotting them on a map, both using historical (mongoDB-stored data) and live data, as Twitter broadcasts it – which is also stored in the database, for good measure.
The completed flow
If you’ve had a minor hiccup, you can delete all the nodes on your flow and just import the following through your clipboard.
[{"id":"d91b755.bf2f008","type":"mongodb3 in","z":"4c2d7f2a.5d485","service":"_ext_","configNode":"d82635c1.fa7c68","name":"","collection":"","operation":"","x":520,"y":580,"wires":[["196b905f.850048"]]},{"id":"ce1e1b49.6f2b","type":"twitter in","z":"4c2d7f2a.5d485","twitter":"","tags":"","user":"false","name":"","topic":"tweets","inputs":1,"x":1230,"y":140,"wires":[["f0ca9201.90a198"]]},{"id":"f0ca9201.90a198","type":"function","z":"4c2d7f2a.5d485","name":"get data","func":"if(msg.tweet.hasOwnProperty('coordinates')){\n\tif(msg.tweet.coordinates!==null) {\n\t\tmsg.payload={};\n\t\tmsg.payload.lat=msg.tweet.coordinates.coordinates[1];\n\t\tmsg.payload.lon=msg.tweet.coordinates.coordinates[0];\n\t\tmsg.payload.text = msg.tweet.text;\n\t\tmsg.payload.screen_name = msg.tweet.user.screen_name\n\n\t\tmsg.payload.name = msg.tweet.user.screen_name+'-'+msg.tweet.id;\n\t\tmsg.payload.id = msg.tweet.id;\n\t\tmsg.payload.created_at = msg.tweet.created_at;\n\t\t\t\t\t\n\t\tdelete(msg.tweet);\n\t\tdelete(msg.location);\n\t}\n}\n\t\nreturn (msg);","outputs":1,"noerr":0,"x":1320,"y":200,"wires":[["dd13063b.74fec8"]]},{"id":"dd13063b.74fec8","type":"sentiment","z":"4c2d7f2a.5d485","name":"","property":"payload.text","x":1420,"y":140,"wires":[["e9b67fe3.04034"]]},{"id":"e9b67fe3.04034","type":"function","z":"4c2d7f2a.5d485","name":"add icon","func":"if(msg.hasOwnProperty(\"sentiment\")) {\n if(msg.sentiment.hasOwnProperty(\"score\")) {\n if(msg.sentiment.score<0) {\n msg.payload.icon=\"hostile\";\n } else if (msg.sentiment.score>1) {\n msg.payload.icon=\"friend\";\n } else {\n msg.payload.icon=\"neutral\";\n }\n msg.payload.sentiment = msg.sentiment.score;\n return msg;\n }\n}\n// silently drop otherwise","outputs":1,"noerr":0,"x":1500,"y":200,"wires":[["246dd3a9.3d4cd4","99be9087.82264"]]},{"id":"cd968b36.6cc5d8","type":"comment","z":"4c2d7f2a.5d485","name":"set search term","info":"","x":1040,"y":160,"wires":[]},{"id":"f419c279.890618","type":"ui_text_input","z":"4c2d7f2a.5d485","name":"for","label":"Search Term","group":"be3d091.5eb43f8","order":0,"width":0,"height":0,"passthru":true,"mode":"text","delay":"0","topic":"for","x":1070,"y":200,"wires":[["ce1e1b49.6f2b","71c12b2d.5ad4ac","90932513.37e75","f93fb8b7.9dadf"]]},{"id":"c92e0028.a57b18","type":"mongodb3 in","z":"4c2d7f2a.5d485","service":"_ext_","configNode":"d82635c1.fa7c68","name":"","collection":"","operation":"","x":1827.5,"y":61,"wires":[[]]},{"id":"99be9087.82264","type":"function","z":"4c2d7f2a.5d485","name":"prep insert","func":"var new_msg = {\n 'collection' : 'tweets',\n 'operation' : 'insert',\n 'payload' : msg.payload\n};\nnew_msg.payload.search_term = flow.get('search');\n\nreturn new_msg;","outputs":1,"noerr":0,"x":1630,"y":60,"wires":[["c92e0028.a57b18","e9e0db47.3703e"]]},{"id":"246dd3a9.3d4cd4","type":"function","z":"4c2d7f2a.5d485","name":"set layer","func":"msg.payload.layer=\"tweets\";\nreturn msg;","outputs":1,"noerr":0,"x":1680,"y":200,"wires":[["f66b5f21.938648","7a4c1f4f.c60068"]]},{"id":"e9e0db47.3703e","type":"debug","z":"4c2d7f2a.5d485","name":"INSERTING:","active":false,"tosidebar":true,"console":false,"tostatus":false,"complete":"true","x":1830,"y":120,"wires":[]},{"id":"f201d68c.2c47d","type":"catch","z":"4c2d7f2a.5d485","name":"ERROR:","scope":["c92e0028.a57b18"],"x":1700,"y":360,"wires":[["6ba1efe6.6bb7e8"]]},{"id":"6ba1efe6.6bb7e8","type":"debug","z":"4c2d7f2a.5d485","name":"","active":true,"tosidebar":true,"console":false,"tostatus":false,"complete":"true","x":1849,"y":373,"wires":[]},{"id":"7a4c1f4f.c60068","type":"debug","z":"4c2d7f2a.5d485","name":"MAPPING:","active":false,"tosidebar":true,"console":false,"tostatus":false,"complete":"true","x":1830,"y":160,"wires":[]},{"id":"71c12b2d.5ad4ac","type":"function","z":"4c2d7f2a.5d485","name":"Store search term","func":"// stashes the search term in the 'flow' object\n// which is shared amongst all the flows\nflow.set('search',msg.payload);\nreturn msg;","outputs":1,"noerr":0,"x":1250,"y":380,"wires":[[]]},{"id":"90932513.37e75","type":"function","z":"4c2d7f2a.5d485","name":"query existing data","func":"// when a new search term arrives, it queries\n// the database for existing tweets that match\n// this term to re-populate the map\nvar new_msg = {};\nnew_msg.collection = 'tweets';\nnew_msg.operation = 'find.forEach';\nnew_msg.payload = { 'search_term' : msg.payload };\nnew_msg.projection = { 'search_term' : 1 };\nreturn new_msg;","outputs":1,"noerr":0,"x":1270,"y":320,"wires":[["1ad432a.54e144d"]]},{"id":"1ad432a.54e144d","type":"mongodb3 in","z":"4c2d7f2a.5d485","service":"_ext_","configNode":"d82635c1.fa7c68","name":"","collection":"","operation":"","x":1480,"y":320,"wires":[["246dd3a9.3d4cd4"]]},{"id":"f93fb8b7.9dadf","type":"function","z":"4c2d7f2a.5d485","name":"clear the map","func":"// ignores the inbound message and instead \n// generates a payload for the map that contains\n// the \"clear map\" command\nmsg.payload={\n \"command\": {\n \"clear\":\"tweets\"\n }\n};\nreturn msg;","outputs":1,"noerr":0,"x":1300,"y":260,"wires":[["f66b5f21.938648"]]},{"id":"f66b5f21.938648","type":"worldmap","z":"4c2d7f2a.5d485","name":"","lat":"","lon":"","zoom":"","layer":"","cluster":"","maxage":"","usermenu":"show","layers":"show","panit":"false","x":1870,"y":260,"wires":[]},{"id":"fe6fe146.7ae0f","type":"twitter in","z":"4c2d7f2a.5d485","twitter":"","tags":"","user":"false","name":"","topic":"tweets","inputs":1,"x":270,"y":400,"wires":[["93eb522a.7a0a38"]]},{"id":"93eb522a.7a0a38","type":"function","z":"4c2d7f2a.5d485","name":"get data","func":"if(msg.tweet.hasOwnProperty('coordinates')){\n\tif(msg.tweet.coordinates!==null) {\n\t\tmsg.payload={};\n\t\tmsg.payload.lat=msg.tweet.coordinates.coordinates[1];\n\t\tmsg.payload.lon=msg.tweet.coordinates.coordinates[0];\n\t\tmsg.payload.text = msg.tweet.text;\n\t\tmsg.payload.screen_name = msg.tweet.user.screen_name\n\n\t\tmsg.payload.name = msg.tweet.user.screen_name+'-'+msg.tweet.id;\n\t\tmsg.payload.id = msg.tweet.id;\n\t\tmsg.payload.created_at = msg.tweet.created_at;\n\t\t\t\t\t\n\t\tdelete(msg.tweet);\n\t\tdelete(msg.location);\n\t}\n}\n\t\nreturn (msg);","outputs":1,"noerr":0,"x":360,"y":460,"wires":[["de58565d.23554"]]},{"id":"de58565d.23554","type":"sentiment","z":"4c2d7f2a.5d485","name":"","property":"payload.text","x":460,"y":400,"wires":[["af62e7b1.d0c2e"]]},{"id":"af62e7b1.d0c2e","type":"function","z":"4c2d7f2a.5d485","name":"add icon","func":"if(msg.hasOwnProperty(\"sentiment\")) {\n if(msg.sentiment.hasOwnProperty(\"score\")) {\n if(msg.sentiment.score<0) {\n msg.payload.icon=\"hostile\";\n } else if (msg.sentiment.score>1) {\n msg.payload.icon=\"friend\";\n } else {\n msg.payload.icon=\"neutral\";\n }\n msg.payload.sentiment = msg.sentiment.score;\n return msg;\n }\n}\n// silently drop otherwise","outputs":1,"noerr":0,"x":540,"y":460,"wires":[["196b905f.850048","da7c03b.5b4a4"]]},{"id":"2023d861.3f4bf8","type":"comment","z":"4c2d7f2a.5d485","name":"set search term","info":"","x":80,"y":420,"wires":[]},{"id":"467648db.262d88","type":"ui_text_input","z":"4c2d7f2a.5d485","name":"for","label":"Search Term","group":"be3d091.5eb43f8","order":0,"width":0,"height":0,"passthru":true,"mode":"text","delay":"0","topic":"for","x":110,"y":460,"wires":[["fe6fe146.7ae0f","3df31ee9.6f2192","14b13fb5.e6718","c947df34.b4e0a"]]},{"id":"75cff3f8.118d5c","type":"mongodb3 in","z":"4c2d7f2a.5d485","service":"_ext_","configNode":"d82635c1.fa7c68","name":"","collection":"","operation":"","x":867.5,"y":321,"wires":[[]]},{"id":"da7c03b.5b4a4","type":"function","z":"4c2d7f2a.5d485","name":"prep insert","func":"var new_msg = {\n 'collection' : 'tweets',\n 'operation' : 'insert',\n 'payload' : msg.payload\n};\nnew_msg.payload.search_term = flow.get('search');\n\nreturn new_msg;","outputs":1,"noerr":0,"x":670,"y":320,"wires":[["75cff3f8.118d5c","18c74b29.cc251d"]]},{"id":"196b905f.850048","type":"function","z":"4c2d7f2a.5d485","name":"set layer","func":"msg.payload.layer=\"tweets\";\nreturn msg;","outputs":1,"noerr":0,"x":720,"y":460,"wires":[["9b86f9e7.6e7018","6eac8794.45e4e"]]},{"id":"18c74b29.cc251d","type":"debug","z":"4c2d7f2a.5d485","name":"INSERTING:","active":false,"tosidebar":true,"console":false,"tostatus":false,"complete":"true","x":870,"y":380,"wires":[]},{"id":"5d950073.699498","type":"catch","z":"4c2d7f2a.5d485","name":"ERROR:","scope":["75cff3f8.118d5c"],"x":740,"y":620,"wires":[["910ab8be.029bb"]]},{"id":"910ab8be.029bb","type":"debug","z":"4c2d7f2a.5d485","name":"","active":true,"tosidebar":true,"console":false,"tostatus":false,"complete":"true","x":889,"y":633,"wires":[]},{"id":"6eac8794.45e4e","type":"debug","z":"4c2d7f2a.5d485","name":"MAPPING:","active":false,"tosidebar":true,"console":false,"tostatus":false,"complete":"true","x":870,"y":420,"wires":[]},{"id":"3df31ee9.6f2192","type":"function","z":"4c2d7f2a.5d485","name":"store search term","func":"// stashes the search term in the 'flow' object\n// which is shared amongst all the flows\nflow.set('search',msg.payload);\nreturn msg;","outputs":1,"noerr":0,"x":290,"y":640,"wires":[[]]},{"id":"14b13fb5.e6718","type":"function","z":"4c2d7f2a.5d485","name":"query existing data","func":"// when a new search term arrives, it queries\n// the database for existing tweets that match\n// this term to re-populate the map\nvar new_msg = {};\nnew_msg.collection = 'tweets';\nnew_msg.operation = 'find.forEach';\nnew_msg.payload = { 'search_term' : msg.payload };\nreturn new_msg;","outputs":1,"noerr":0,"x":310,"y":580,"wires":[["d91b755.bf2f008"]]},{"id":"c947df34.b4e0a","type":"function","z":"4c2d7f2a.5d485","name":"clear the map","func":"// ignores the inbound message and instead \n// generates a payload for the map that contains\n// the \"clear map\" command\nmsg.payload={\n \"command\": {\n \"clear\":\"tweets\"\n }\n};\nreturn msg;","outputs":1,"noerr":0,"x":340,"y":520,"wires":[["9b86f9e7.6e7018"]]},{"id":"9b86f9e7.6e7018","type":"worldmap","z":"4c2d7f2a.5d485","name":"","lat":"","lon":"","zoom":"","layer":"","cluster":"","maxage":"","usermenu":"show","layers":"show","panit":"false","x":910,"y":520,"wires":[]},{"id":"6564f7a4.916f1","type":"mongodb3 in","z":"4c2d7f2a.5d485","service":"_ext_","name":"","collection":"","operation":"","x":840,"y":720,"wires":[[]]},{"id":"d82635c1.fa7c68","type":"mongodb3","z":"","uri":"mongodb://user:pass@host:port/mongodb","name":"Heroku mLab","options":"","parallelism":"-1"},{"id":"be3d091.5eb43f8","type":"ui_group","z":"4c2d7f2a.5d485","name":"date_range","tab":"f011a794.8b5508","disp":true,"width":"6","collapse":false},{"id":"f011a794.8b5508","type":"ui_tab","z":"4c2d7f2a.5d485","name":"Tweet Filter","icon":"dashboard"}]
(Remember to update the ‘twitter in‘ node’s Twitter ID and the ‘mongodb3‘ credentials by clicking the pencil by Server setting that says ‘Heroku mLab‘ before deploying!)
Downloading our data
Back on your Heroku dashboard, have a look at the Overview tab for your app. Under ‘Installed add-ons‘ is your ‘mLab MongoDB sandbox’. Click it, and let’s explore the data in the database.
Under the ‘Collections‘ tab are our stores. ‘nodered‘ is created by default, but that ‘tweets‘ one is the one we created. Click it.
Click ‘table‘ by ‘Display mode‘, and then click ‘edit table view‘. Paste the following into the editor that appears,
{

"Search": "search_term",

"Name": "screen_name",

"Date": "created_at",

"±": "sentiment",

"Body": "text"

}
then click ‘SUBMIT‘. This gives you a spreadsheet-like interface into your data.
If you want a desktop tool to download your data as a CSV file, which any spreadsheet programme should import, you can download Robo3T for free. When you launch it, you need to ‘create’ a new connection.
You will need to manually break apart the connection string MONGODB_URI provided.
The structure is mongodb://username:password@address:port/database/. On the Connection tab, copy the address field from the relevant part of your URI over, and copy the port over as well. You can choose any relevant Name you want – it’s not part of the connection negotiation. On the Authentication tab, copy over the Database field, the username, and pasword, and make sure the tickbox by Perform authentication is set. At this stage, if you click the ‘Test‘ button in the lower-left, you should sett a Diagnostic window appear with two green ticks in it; if you don’t, double-check your settings.
Finally, open your connection.On the left, click the disclosing arrow first by your connection name, then the Collections (5) item, then the System item, then finally the tweets item. Double-click this tweets item to open it on the right-hand panel. On this side, click the icon that looks like a document near the top far-right. This will export your document as JSON, where you can copy-and-paste it.
There are online resources where you can paste your JSON and have it converted to CSV or Excel files. The reader is left to explore file storage, CSV writer, and json2csv nodes in Node-red, should they wish to shortcut this process.
Review
We’ve created a tool that collects Tweets in realtime and stores them in a database. We’ve done this without any ongoing computing or server infrastructure costs. We’ve looked, briefly, at Heroku, a Platform-as-a-service, and found a way to create internet-hosted deployments of Node-red in a single click. We’ve seen how to create Applications on Twitter, and to use those credentials in our Node-red application. We’ve look at ways t reformat the msg object Node-red passes around, and seen how to shape them to plot them in real-time on a map. We’ve looked, very briefly, at MongoDB, a document-oriented database, and used a free deployment of one to store our tweets and metadata, as well as how to query and filter them in our Node-red application. We’ve looked at three ways to connect to MongoDB: through Node-red, through mLab’s web interface, and the cross-platform desktop tool, Robo3T. We’ve look at ways to export and convert our data to CSV, even if it’s a little crunky.
Inside Node-red, we’ve looked at ways to update entire sets of connections at a time, how to splice new nodes into existing flow connections, and ways to use copy-and-paste to update and replace sections of, and entire, flows.
Thanks for following along – this was an intensive project, but showcases ways that Node-red can help you answer research questions which no other tool can support.
If you’d like a workshop or support for your project or department in using Node-red, please contact us through our contact form or email!
- The version shipped on Raspbian (as of June 2018) is out-of-date and will not work for this tutorial. However, the Node-red maintainers provide a script which will update your Node-red to the latest version, but it’s not without a few issues of its own.
• You will need to use ‘node-red-start‘ at the terminal instead of ‘node-red‘ any time you need to start Node-red
• You will no longer be able to update Node-red through the normal Raspbian update channels
Our advice is to use a second SD card and install a second copy of Raspbian on it, on which you can run this script. When the main Raspbian software distribution catches up, you can just transfer your flows to your main version of Raspbian and archive your patched Raspbian (or re-use the card).
To patch your copy of Node-red, open a terminal and copy-and-paste the following:
bash <(curl -sL https://raw.githubusercontent.com/node-red/raspbian-deb-package/master/resources/update-nodejs-and-nodered)↩